Broken Zipper Pulls

October 22, 2013

Greetings! A couple of people have contacted me recently because the beaded zipper pull on their purse broke. A little while back, I tried a new brand of wire because it had better color options, but this new wire does not appear to be standing up to the stresses of normal use as well as it should. I am no longer using the new brand of wire, however there are already many purses out in world with the new wire. So, I apologize if your zipper pull broke!

I am offering free clip-on replacement zipper pulls, no questions asked. Simply email me at

Amanda@cattywumpusbags.com

and ask for a new one. I need your address and a couple of preferred color options for the beads. Also, it is totally optional, but if you send me a picture of the purse I can better match the new pull to the fabric you have.

Alternatively, if you would like for your new zipper pull to be permanently attached (rather than clip-on), you can mail the purse to me and I will attach a new pull and then mail it back to you at no charge. Email me and we’ll work out details.

Again, I am so sorry about the zipper pulls!


Making Labels

December 20, 2012

When I first decided that I needed to put labels in my purses, to ya know, “be professional”, I did some online searching on how to make your own fabric labels, and found this:

http://craftingagreenworld.com/2009/01/23/5-ways-to-make-your-own-fabric-labels/

Of the five methods, I liked the method presented here best:

http://allysonhill.typepad.com/photos/make_fabric_labels/1.html

She does a really good job of explaining the process, and her photos are wonderful. It was extremely helpful in the begining. Over the course of doing it a dozen times though, I have found a few improvements, which I would like to share. I will assume that you already have your template prepared, and you have your roll of photo fabric (which you purchased at JoAnn Fabrics with a 50% off coupon). You will cut the fabric into 8.5″ X 11″ sheets and follow the instructions on the package (or Allyson’s tutorial) to print, wash, and iron the fabric dry.

Now, here is where I will diverge from Allyson’s tutorial. She irons and cuts her labels out, and then dips each end in Fray Check…one by one. I do not have that kind of patience. Here’s what I do:

IMG_4967  IMG_4968

Iron the creases for the labels and then draw a line of Fray Check across the fabric where you will cut the tags. [I used Stop Fraying this time because I was out of Fray Check and it was a mistake. Stop Fraying is not water soluable (I had to use acetone to get it off my fingers) and it dries to a tacky state that is very annoying to work with].  You do not have to do the bottom edge because it will be inside a seam.

Then, use your rotary cutter and ruler to cut the labels out:

IMG_4969  IMG_4970

Make sure the strips are folded when you cut them so both sides are identical.

Easy Peasy. I did 4 pages in about an hour, start to finish, including 15 minutes for the ink to dry after printing. Not bad!

Kentucky Monthly Magazine’s Holiday Gift Guide

November 21, 2012

I am very honored to be featured in Kentucky Monthly’s Holiday Gift Guide this year, along with many fantastic local artists. Check it out!!!

http://www.kentuckymonthly.com/articles/holiday-gift-guide/

Holiday Gift Guide 2012

Getting Organized Part 2

November 18, 2012


There are some sections that are not done, but I figured that I’d better post now rather than wait who knows how long to be completely done. I’ll never be completely done!


Getting Organized (Artistically of course!) Step 1

November 2, 2012

You may know that I moved into a new house 15 months ago. At the time, I set up my sewing machines and a couple of tables in my new studio, but that was about it. This summer my husband helped me build an enormous cutting table with storage underneath, but I’ve still been tripping over crates of stuff and ranting about how I can never find anything. I’ve had a pretty good couple of months business-wise, so I decided I could afford some sort of storage system. So, I started designing shelves. Not just designing where they would go, but designing the actual shelves! Here’s the project:

1. Inspiration:

These are wallpaper samples that I got free at the Zero Landfill Project a couple of months ago. My other inspiration was the fascination I’ve had lately with citrus (colors and shapes).

2. Plan

I wanted the color scheme of bright orange, yellow, and teal. Happy, fun colors that would be over the top anywhere else in the house, but I could get away with in the studio. I had the idea to paint and decoupage the underside of the shelves, because they will be high up on the wall and the undersides will be visible.

3. Collecting materials and getting to work:

Scrapbooking paper from JoAnn Fabrics and Hobby Lobby, along with some templates I drew on copy paper:

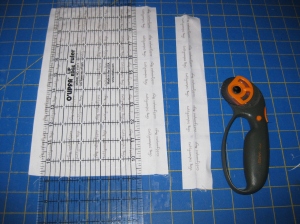
Which I cut out and “colored” with Sharpies:


Then I used Mod Podge to glue the paper cutouts onto the painted wood:

And I used latex paint samples (which you can get for $3 a jar at Home Depot) to paint designs:


If I did it again I would use some sort of paint pen rather than paint brushes. I chose the vibrancy of paint over the precision of markers, and I’m not sure I couldn’t have gotten both had I looked around a bit more for different materials.


When I was done with all of the shelves, I covered them with two coats of Mod Podge. I did this for two reasons. One is that the guys at the paint counter will tell you that sample cans shouldn’t be used as a “finish coat” (I am not sure if this is just to sell “real” paint, or if it’s really true, but I didn’t want to chance it). The other is that sample cans are flat (as opposed to semi-gloss, etc.) and I wanted it to have a glossier appearance. So in the end, they came out like this:


They came out darker than I had intended, and they remind me a little of certain Mexican restaurant decor I have seen, which was also not my intent, but overall I like them. Once they get affixed to the wall, I will post pictures of that, and also Step 2 of getting organized, which involves LOTS of clear plastic bins with flower and citrus tags on them.

Fleece!!!

October 25, 2012

I’ve been spending a lot of time lately making things from fleece. I have a friend who collects holiday gifts for families that need a little help, and she had several girls on her list. I started thinking of things my daughter would like, and realized that my daughter is quite enamored with owls lately. They seem to be very popular (again!). So I made these scarves:

Fleece is super easy to work with because it doesn’t fray and you don’t need to finish the edges.  Also, I used Fabric Fusion glue for most of the work instead of sewing eveything on, although I did sew the buttons just to be sure they stayed.

The single flowers are hair clips! Plain hair clips are available in the jewelry section of craft or hobby stores and a package of 6 or 8 costs about $2-$3. Then you just glue or sew on whatever you want! In the past I have used fake flowers.  I made several for my daughter’s Flamenco recitals. I used huge flowers 6 inches across, and they looked fantastic with her Flamenca side bun. But, if you use 2 or 3 inch flowers, they could be used every day for pony tails or bangs. The stores at the mall charge up to $8 a piece for these, but you could make half a dozen for $8. This would be a great stocking stuffer for your young ladies, and it would also be a fantastic project for a girl scout troop or sleepover party. So have fun with it!

Accents

October 14, 2012

So, I did a trunk show yesterday at my friend Lucy’s shop, Accents.

It was great hanging out with Lucy.

Lucy does increadible beadwork like this:


She also does amazing jewelry, a lot of which is for sale in the shop. Oh, yeah, and she also does framing!

She has framed several pieces of art for me, and always does a fantastic job. So if you need something framed, or want to see mind-bogglingly intricate beadwork jewelry, go see her at 2206 Dundee Road, Louisville in Douglas Loop! Tell her I sent you.

Cathy Wade

October 9, 2012

Meet my friend Cathy Wade!

Cathy is vibrant, fun, positive, outgoing, and very talented with upcycled cashmere. In her studio at the Mellwood Arts Center she repurposes cashmere sweaters into all sorts of cool accessories and products for the home. Here are some pictures of her work:


You can check out more of her great fall and winter items at

http://www.designsbycathywade.com/index.html

Kentucky Artisan Center at Berea

October 9, 2012

Last Friday I had the opportunity to attend a workshop sponsored by the Kentucky Crafted Program. I learned a lot about owning a craft business, and heard yet again about the importance of social media. It inspired me to get back onto my blog, and I can’t believe I remembered the password because it’s been so long since I posted.

So, here goes!

Today I want to tell you about the Kentucky Artisan Center. Just off I-75 at Berea, the Center is a state agency in the Tourism, Arts & Heritage Cabinet of the Commonwealth of Kentucky. It was founded as an economic development engine for artists, and it showcases the work of hundreds of Kentucky artisans. Since it opened in 2003, two million people have visited! I had been there 3 or 4 times before, and I was always impressed with the quality and quantity of work on offer. I bought gifts like Bourbon Balls on my way out of town to visit relatives, and things like handcrafted soaps and pottery for myself. I always thought that I would like to sell my purses there someday.

Well, friends, someday is today!

When I realized that the Kentucky Crafted workshop was going to be held at the Artisan Center, I contacted the Exectutive Director, Victoria Faoro, and asked if she could meet with me while I was there. Luckily for me, she agreed. I was pretty nervous going into the meeting, but Victoria is a wonderful and warm person who is all about helping artists be successful. She was very easy to talk to, and very complimetnary of my purses. She was able to take quite a few for the shop, which I am thrilled about. My purses went out on the floor Saturday, and I know that at least one sold that day, because I recieved an email from the woman who purchased it!

We are so lucky here in Kentucky to have so many state programs like the Artisans Center and Kentucky Crafted devoted to nurturing and supporting artists. So, show them that their investments are paying off by visiting the Artisan Center!

http://www.kentuckyartisancenter.ky.gov/index.aspx

Studio Sale

December 13, 2011

My good friend Caroline Zama of Star Bird Pottery (starbirdpottery.com) and I are having a studio sale at her studio in St. Matthews this Saturday from 11 to 3. Come out and see us if you have the chance!

    215 Brunswick Road            

    Louisville, KY  40207